Last updated on July 7th, 2024 at 10:51 am
Before implementing Facebook Messenger on your website, consider whether you have the time (or staff) to respond to messages quickly. If so, adding Facebook Messenger to your website is an easy way to gain additional sales conversions.

Image by Gerd Altmann from Pixabay
This post may contain affiliate links. We may earn a commission if you purchase an item through our links. It costs you nothing and helps us to fund this blog. Please see our Affiliate Disclosure & Notification for details.
Your business is all set up – you’ve got a Facebook business page with some likes and a great-looking website. And while you can embed Facebook feeds and page links into your website pretty easily, you can really take it to the next level by adding Facebook Messenger right to your site.
Imagine your customers being able to chat to your Facebook page right from your website. Contact forms are OK, but live messaging is today’s marketing. So let’s go over how to set it up.
*these instructions are accurate up to the publishing date of this article
Step 1: Update Your Facebook Page Whitelist Settings
The first thing you need to do is set whitelist entries on your Facebook page. Fortunately, Facebook locks down access to your page to any domains that you haven’t specifically allowed. This is for your protection.
Log into Facebook and go to your business page. Once there, click the Settings link on the upper right-hand side of the screen:

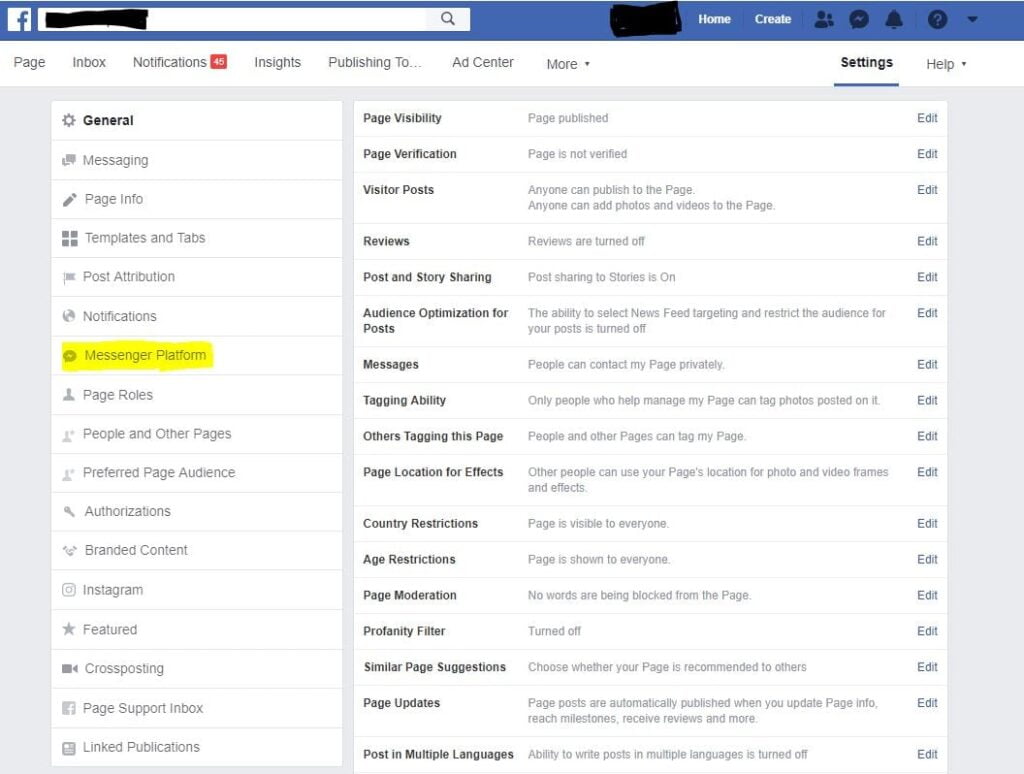
From there you’ll be taken to the main settings page. Click the Messenger Platform tab on the left-hand pane:

Scroll down the Messenger Platform settings until you see the section called Whitelisted Domains. In the field, type in the url for the website that you want to put Facebook Messenger on and then click Save:
At this point, you’ve successfully configured your Facebook Business page settings to accept connections directly from your website.
Step 2: Configure the Customer Chat Plugin
Continuing from where you left off in Step 1, scroll further down the Messenger Platform settings until you see the section called Customer Chat Plugin. Click the Set Up button.
Follow the instructions on each of the screens that follow. For most users, the defaults will work just fine. At the end of the configuration, you’ll be provided with the code snippets that need to be added to your website to implement the Messaging feature.
Step 3: Install the Code
You’ll need to paste the code snippet provided in Step 2 into each page of your website where you want the Messenger plugin to appear. How you do this will depend on how your website is coded.
For full-service platforms such as SquareSpace or Wix, you’ll need to follow their instructions for adding code snippets.
If you’re a WordPress user, there are a handful of plugins that will add the code for you and Facebook has an official plugin you can download and install right from the WordPress repository.
Once you’ve completed these steps, visitors to your website will be prompted with a “Hi! How can we help you?” messenger box that allows them to communicate with you via Facebook Messenger without ever leaving your website.
The Messenger plugin will only trigger if the visitor is already logged into their Facebook account on the browser they visit your site from. This eliminates the possibility you’ll bounce them off your site to log into Facebook. What this also means is that visitors using privacy protection such as incognito browsing won’t see it.
Facebook Messenger: Final Notes (and an expectation check)
Before implementing Facebook Messenger on your website, consider whether you have the time (or staff) to respond to messages quickly. Customers who send messages via this type of channel normally expect a quick response. Adding the messenger to your site and then never checking your messages is a quick way to alienate potential customers.
That being said, adding Facebook Messenger to your website is an easy way to get the communication ball rolling with prospective customers and gain additional sales conversions.
Sharif Jameel is a business owner, IT professional, runner, & musician. His professional certifications include CASP, Sec+, Net+, MCSA, & ITIL and others. He’s also the guitar player for the Baltimore-based cover bands, Liquifaction and Minority Report.


Pingback: 4 Key Steps to a Startup Growth Strategy that Actually Work - Website Design Baltimore | SEO Baltimore | CGS Computers
Pingback: Proven Techniques to Boost Customer Experience Through Websites - Website Design Baltimore | SEO Baltimore | CGS Computers
Pingback: 5 Amazing Ways that OpenAI's ChatGPT is Set to Change the World - Website Design Baltimore | SEO Baltimore | CGS Computers