Last updated on July 7th, 2024 at 10:50 am
Learn how to create an Elementor back to top button. A back to top button helps improve the user experience on your website - here's how to add one using Elementor Pro.
This post may contain affiliate links. We may earn a commission if you purchase an item through our links. It costs you nothing and helps us to fund this blog. Please see our Affiliate Disclosure & Notification for details.
There are many themes that have a built-in scroll to top (or back to top) button that sticks to the bottom of the browser window. Unfortunately, it’s not a standard option on all themes. On our site, we use the pro version of Astra which does have it built-in, but if you’re using the free version it’s not an option. So in this post, we’ll show you how to use Elementor to create a back to top button for your own website without having to pay for a premium theme – or in case you just don’t like the styling that comes with your existing theme’s scroll to top button.
You will need Elementor Pro to do this, and if you’re concerned about the price trust me, it’s well worth it. The remainder of this post assumes you have a working knowledge of Elementor. If you use the WordPress Astra theme and don’t have the money for Elementor Pro, we’ve got you covered in here: Making a Scroll to Top Button with Astra Free.
Creating a Scroll to Top Button with Elementor
Watch the video directly on YouTube
Step 1. Set the CSS ID to Define the Top of Each Page
Before we even create the button, the first thing we need to do is define what the ‘top’ is on our website. Assuming you’ve built the entire site with Elementor, you’ll need to modify the top section of each page & post template using Elementor’s Advanced Settings Tab.
If you haven’t built the entire site with Elementor, you can use Chrome Developer Tools to inspect a common element at the top of all your website pages & posts to determine its CSS ID – make a note of it and skip down to the next section. We aren’t providing explicit instructions for this since it’s going to be different for every theme.
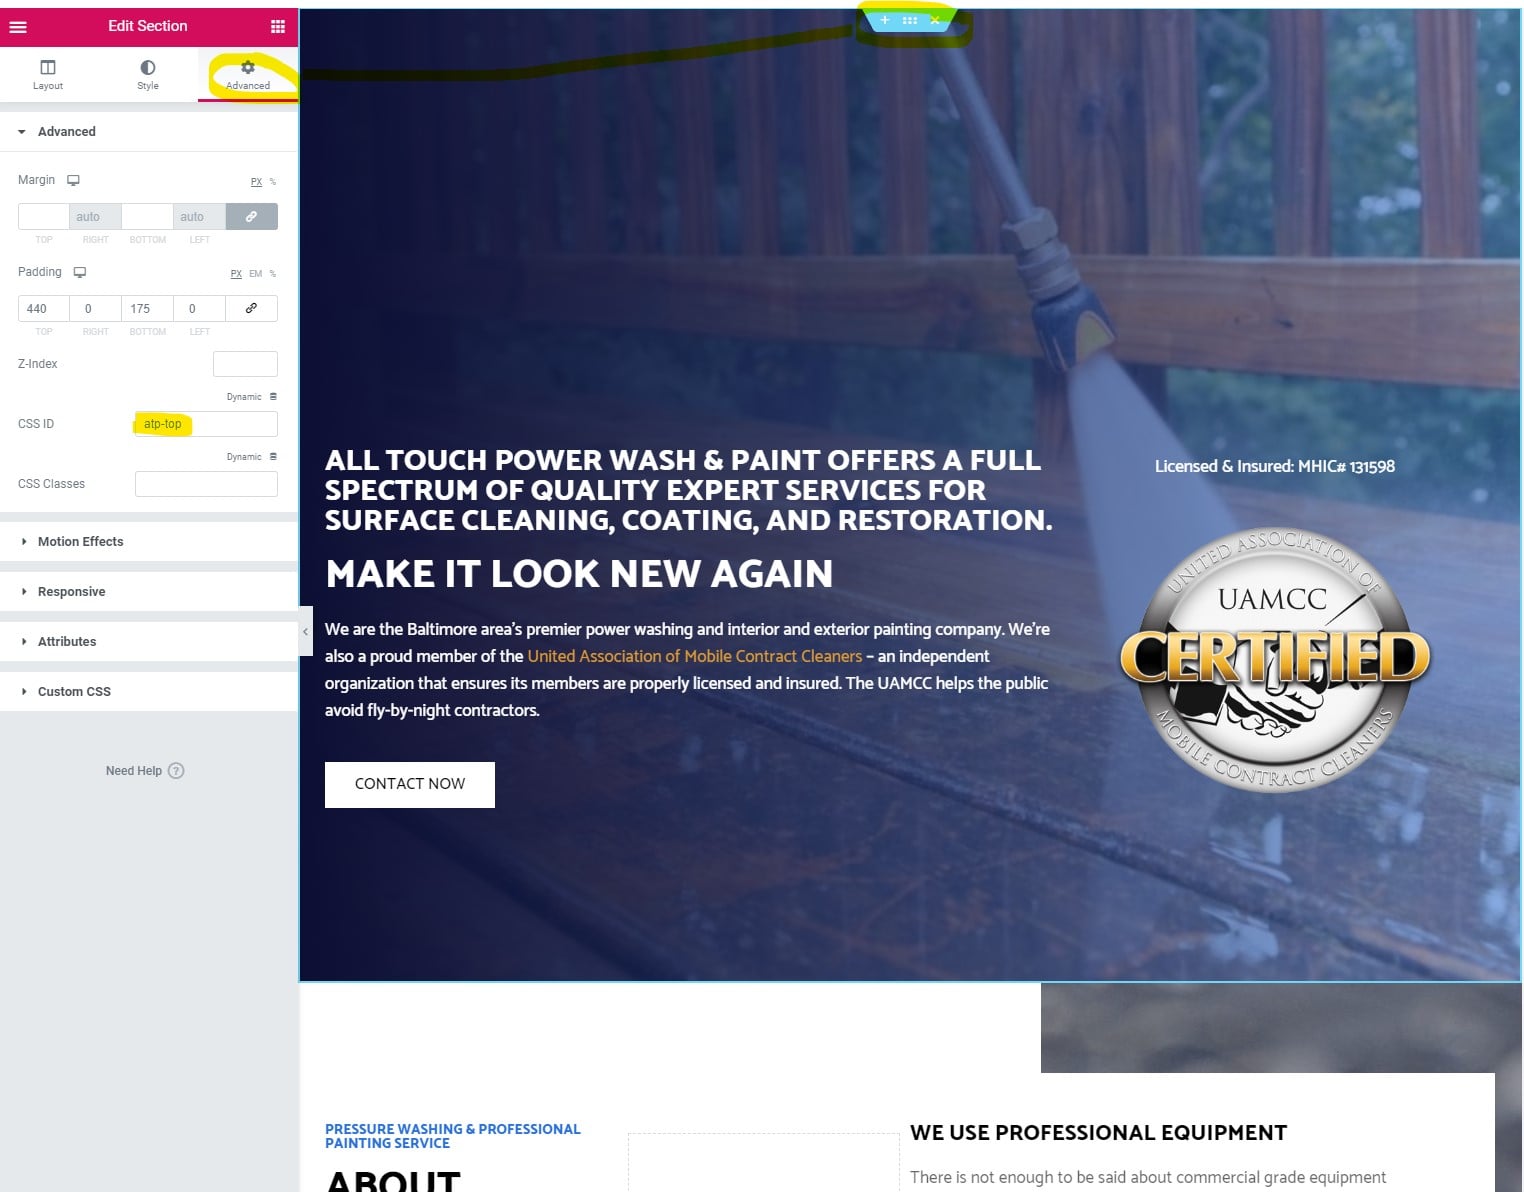
As you can see in the image above, we’ve selected the very top section on the page from within the Elementor editor and then chosen the Advanced tab to the left.
The highlighted field, CSS ID, is normally empty by default. In this case, we’ve added an ID called “atp-top”. You can set this to anything you’d like, but you’ll need to make sure it’s something you’ll remember because we’ll need it later. You also want to make it something that doesn’t match existing CSS IDs from your themes and plugins to avoid conflicts.
Use the same CSS ID for all of your page and post templates. Most sites only have 1 of each, but if you’ve build custom pages using Elementor, you may need to edit those as well.
Step 2. Create the Button As a Global Widget
One of the things the current Elementor version doesn’t do well is give you the option to simply create a new global widget. You must create the widget within the context of an existing page or post template.
I do this by creating a blank Elementor Canvas page (no distractions) and title it “Global Widgets”. I leave this page as draft and use it for creating and editing my global widgets.
From within the Elementor Canvas, add a new button. You can style it any way you like using the standard Elementor options. To make the button actually work, you’ll need to set the button link to the CSS ID you set in Step 1 with a “#” in front of it. So in our example above, we’d set the button link to “#atp-top”.

The next thing we’re going to do is move over to the Advanced tab and under Motion Effects, we’ll set the Sticky option to “Bottom”.
From a functional standpoint, the button is now ready for use. We don’t want to publish this page, but we do want to save it in case we want to come back later and make changes so click the arrow next to publish and then click “Save Draft”.
Finally, right click the actual button itself within the editor and choose “Save as Global” and give your widget a name.

Once you have it saved, you can exit to your WordPress dashboard and view all your Elementor templates. You’ll see the new global widget you just created in the list. Notice you can’t edit it from here – this is why we use a draft Elementor Canvas page since you can’t directly edit an Elementor global widget.
Also notice that your new global widget has a shortcode assigned to it. Copy that shortcode because we’ll be using it in the next step.
Step 3. Placing the Back to Top Widget on Your Site
This process is highly dependent on your theme options. You’ll want to place the shortcode somewhere near the bottom of your site. Generally, I prefer to use a footer widget if the theme has it available.

Once you’ve saved your widget, go to your website and you’ll see your new back to top button, pinned to the bottom of the page. Pretty cool huh?
Here’s what my example site looks like:

You can test it by scrolling down your page and clicking it, the screen should move back to the top. If it doesn’t work, you’ll need to double-check all the CSS ID entries you created & used. You may also need to clear caches, etc…
Why Scroll to Top Anyway?
Having a scroll to top button available for your site visitors is great for your user experience. This is especially true for pages that can be scrolled quite a bit or for those mobile visitors who must scroll for even small pages.
You can also use these techniques to mark other sections of your page for easy jump-to links. For example, perhaps your business doesn’t need an entire About page, it just needs a section on the front page. You can give that section a CSS ID and then link to it from one of your menu choices.
Back to Top Button in Elementor: Final Thoughts
Elementor Pro is a powerful tool that can be used for more than just page-building. Creating a scroll to top button when your existing theme doesn’t already have one is just one small thing you can do with it.
If you would like to purchase Elementor Pro, head on over to their site to buy it now.
Sharif Jameel is a business owner, IT professional, runner, & musician. His professional certifications include CASP, Sec+, Net+, MCSA, & ITIL and others. He’s also the guitar player for the Baltimore-based cover bands, Liquifaction and Minority Report.

Subscribe to Our Mailing List
If you found the information in this post helpful, we'd love to have you join our mailing list. We promise we won't spam you, we only send out emails once a month or less.